Library Subject Guides
Class Collaborate is a real-time video conferencing tool that lets you have discussions, files, share applications, and use a virtual whiteboard to interact.
The official name is Class Collaborate, but it's usually just called Collaborate.
Collaborate is a video-conferencing tool used for online seminars and other study sessions. You can talk with the tutor and other students, ask questions in the chat, share files and show your screen.
Video demonstration (for a good overview): Class Collaborate user interface tour [YouTube video]
You'll need one of these options to join a Collaborate Ultra session:
If you're using Chrome v86 (or newer), you'll need to enable cookies [Google Doc].
Collaborate runs through the VLE, so you don't need any extra software.
You'll also need headphones/speakers, and optionally a microphone if you want to talk and a webcam for others to see you.
Video calls can be very demanding on your internet connection, so use a cable internet connection if you can, or try to get a good wifi connection.
Find out more:


There are two main ways to join a Collaborate session, depending on how your tutor has chosen to set up the sessions.

Once you've joined a session, make sure your audio and video are set up, and you can hear what's going on. It's a good idea to try to join a few minutes early so that you can get set up before the class starts.
Find out more:
Here are the key things you need to know to participate in a Collaborate session. Don't worry if it all seems confusing to start with - once you try it out, it'll be much easier.
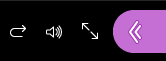
In the centre of the main window, you'll find some circular icons at the bottom of the screen.

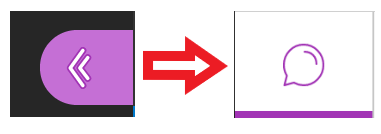
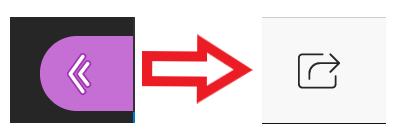
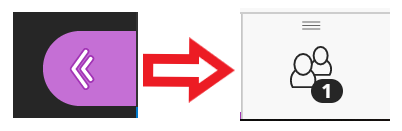
In the bottom right corner of the screen, you'll see a purple button with two arrows. Click this to open the Collaborate panel, which has four icons at the bottom:

Find out more:
To open the Chat, first click the purple arrow icon to open the Collaborate panel, then the Chat icon (speech bubble):
To write a chat message, click 'Everyone' and then write a message in the box below:

Collaborate session recordings include messages to 'Everyone' in the main session room. Private messages, and chat within breakout rooms aren't recorded.
Your tutor might put you into smaller Breakout Groups groups to discuss a topic or work on a task together.
Nothing is recorded from Breakout Groups - no audio, video, chat or shared content.
To help you collaborate, there are some useful sharing tools. To access these, first click the purple arrow icon to open the Collaborate panel, then the Share icon (box with an arrow):
The sharing options are:
You could also share the link to a Google Doc or Slides in the chat.
Your tutor might automatically move you to a group, or you might need to move yourself into a group.
To move Breakout Groups, first click the purple arrow icon to open the Collaborate panel, then the Attendees icon (two people). Then click the door icon next to the group you want to join.
Find out more:
If session recordings are available, they'll include the audio and screen from the main room and the Everyone chat channel. Nothing is recorded from breakout rooms.
To access recordings:

To download the recording or captions (if permitted), click the three dots icon to the right of the session name.
You can adjust the volume, turn captions on/off (if available) and jump forwards/backwards using the playback controls.
To view the Chat messages, click the purple arrow icon to open the Chat panel, as you would during a session.
Captions are available if live captions were used in the session, or if the tutor has added them later to the recording. You can use these while watching the video, or download them as a transcript. Alternatively, a text-based summary might be provided instead of captions.
Find out more:
You may also use other video conferencing tools like Zoom or Google Meet:
